Qt5入门 日期:2020/07/24
学习参考:Bilibili
这段时间帮导师做一个项目的时候,正好用到有关Qt5的一些技能。趁此机会稍微入门了一下,感觉跟C++搭配以后Qt会经常用到,就写了一个很简单的框架,以后有机会会进一步完善。Qt-model-github
学Java的时候学过不少前端的知识,用法其实大同小异,不过Qt使用的时候真的很有一种在写Java的感觉。这里介绍和归纳一些简单入门知识点,方便日后速查。
构成Qt基本框架的有几个基本的外层容器控件(应用&窗体)。我比较喜欢的外层嵌套方法为:QApplication > QMainWindow/QWidget >QViewer。
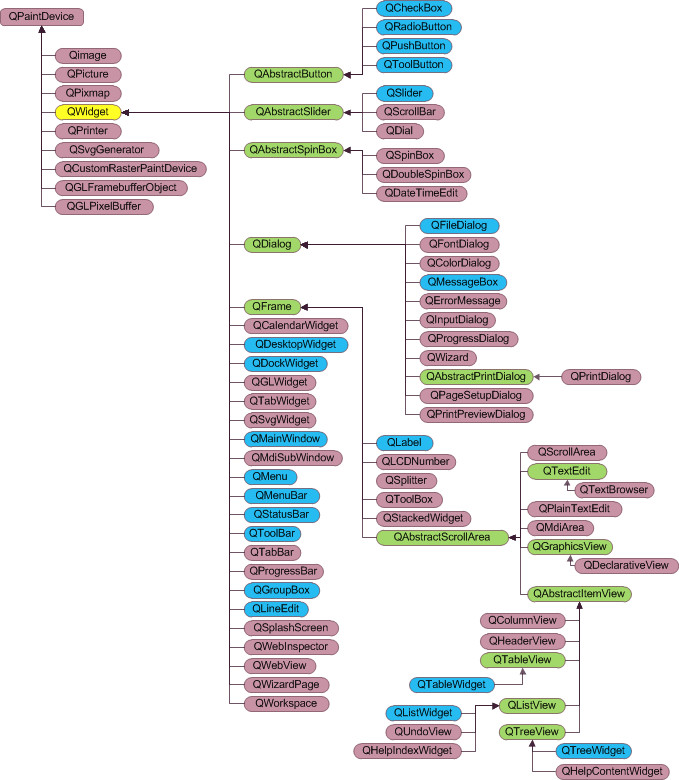
在Qt中,所有的类都继承自QObject,大部分的子控件都是QWidget的子类。通常,我们作主窗口时,使用的是QMainWindow 而不是QWidget,原因在于QMainWindow能够显示QMenuBar和QToolbar。
这是一个简单的基本窗口:
1 2 3 4 5 6 7 8 9 10 11 12 13 14 15 16 17 18 19 20 21 22 23 24 25 26 27 28 29 30 31 32 33 34 35 36 37 38 39 40 41 42 43 44 45 46 47 48 49 50 51 52 53 54 55 56 57 58 int main (int argc, char * argv[]) QApplication app (argc, argv) ; MyMainWindow w; w.show();C return app.exec(); } #ifndef MAINWINDOW_H #define MAINWINDOW_H class MainWindow :public QMainWindow { Q_OBJECT public : MainWindow(QWidget *parent = nullptr ) { setWindowTitle("[[Window Title]" ); setWindowIcon(QIcon(("../icons/title_icon.ico" ))); setGeometry(300 , 300 , 960 , 640 ); _viewer = new MyViewer; this ->setCentralWidget(_viewer); }; ~MainWindow() { delete _viewer; }; MyViewer* _viewer; private slots: void slotOpen () }; #endif #ifndef MYVIEWER_H #define MYVIEWER_H class MyViewer :public QWidget { Q_OBJECT public : explicit MyViewer (QWidget *parent = nullptr ) }; void testLayout () QPalette pal; pal.setColor(QPalette::Background, Qt::red); setAutoFillBackground(true ); setPalette(pal); } }; #endif
也可以根据具体的使用场景,使用QApplication、QMainWindow、QViewer的继承子类,实现更多定制化的功能(如事件的响应)。
在MainWindow的构造函数中,可以添加QMenuBar、QToolBar和QStatusBar:
1 2 3 4 5 6 7 8 9 10 11 12 13 14 15 16 17 QMenuBar* _menubar = menuBar(); QMenu* _menu_1 = _menubar->addMenu("File" ); QAction* _action_1 = _menu_1->addAction("Open" , this , SLOT(close ()), QKeySequence::Open); _action_1->setToolTip("Click to close window" ); _menu_1->addSeparator(); QToolBar* _toolbar = addToolBar("My Toolbar" ); _toolbar->addAction(_open_action); QStatusBar* _statusbar = statusBar(); QLabel* _label; _statusbar->addWidget(_label = new QLabel()); _label->setText("<font style='bold'>Ready</font>" );
下面列举出的是Qt用到的一些主要控件:
1
2
3
4
5
6
7
8
9
QPushButton button; button.setText("Button Name" ); button.setParent(this ); QObject(&button, SIGNAL(clicked()), &obj, SLOT(slotFunction())); button->setStyleSheet("QPushButton { font:bold 16px; color: red}" ); button->setDefault(this );
QLabel 1 2 3 4 5 6 QLabel label; label.setText("<h1>Qt</h1>" ); label.setPixmap(QPixmap("../pix.jpg" )); connect (label, &QLabel::linkActivated, [](QString str) { qDebug() << str; });
QLineEdit & QCompleter 1 2 3 4 5 6 7 8 9 QLineEdit edit; edit.setParent(this ); edit.setEchoMode(QLineEdit::PasswordEchoOnEdit); qDebug() << edit.text (); edit.setPlaceholderText("Please input text: " ); QCompleter co ({ "abc" , "123" , "998" }) ;co.setFilterMode(Qt::MatchContains); edit.setCompleter(&co);
QTextEdit 1 2 3 4 5 6 7 8 9 10 11 12 13 14 QTextEdit edit; edit.setText("abc" ); edit.setText("<table border=1><tr><th>head1</th><th>head2</th></tr>" "<tr><td>data1</td><td>data2</td></tr>" "<tr><td>value1</td><td>value2</td></tr>" "</table><br>" "<img src='../aaa.jpg'></img>" ); connect (edit, &QTextEdit::textChanged, [&]() { QTextEdit* _edit = (QTextEdit*)this ->sender(); qDebug() << _edit->toPlainText(); }); edit.setVerticalScrollBarPolicy(Qt::ScrollBarAsNeeded);
1 2 3 4 5 QRadioButton radio; radio.setText("Radio" ); connect (radio, &QRadioButton::clicked, [](bool v) { qDebug() << v; });
QCheckBox 1 2 3 QCheckBox check; check.setParent(this ); check.isChecked();
QComboBox 1 2 3 4 5 6 QComboBox* combo = new QComboBox(); combo->addItem("Select Item 1" ); combo->addItem("Select Item 2" ); combo->setEditable(true ); connect (combo, SIGNAL(currentIndexChanged(QString)), this , SLOT(slotComboBoxIndexChanged(QString)));combo->setCompleter(new QCompleter(combo->model()));
QGroupBox 1 2 QGroupBox* group = new QGroupBox("Some items" ); group->setLayout(new QHBoxLayout());
QSlider & QSpinBox 1 2 3 4 5 6 7 8 9 10 11 QSlider* slider = new QSlider(); slider->setMaximum(100 ); slider->setMinimum(0 ); slider->setOrientation(Qt::Horizontal); QSpinBox* spinBox = new QSpinBox(); spinBox->setMaximum(100 ); spinBox->setMinimum(0 ); connect (slider, SIGNAL(valueChanged(int )), spinBox, SLOT(setValue(int )));
QDateTimeEdit 1 2 3 QDateEdit* date = new QDateEdit(); QTimeEdit* time = new QTimeEdit(); QDateTimeEdit* dateTimeEdit = new QDateTimeEdit();
QLCDNumber 1 2 3 4 5 QLCDNumber* lcd = new QLCDNumber(10 ); lcd->display (123 ); lcd->setMode (QLCDNumber::Hex); lcd->setSegmentStyle(QLCDNumber::Outline);
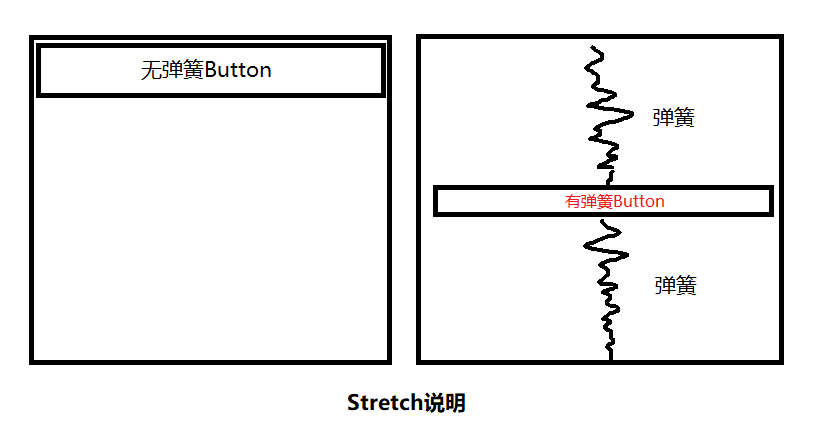
3. Layout Qt中用到的几个Layout这要以QHBoxLayout、QVBoxLayout和QGridLayout为主。这里有一个比较重要的概念:【弹簧】,即Stretch,顾名思义,可以理解成通过在没有控件的地方放置弹簧使得布局尽可能地撑开,能够做到保持控件的大小不变而通过弹簧的拉伸改变空白区域的大小。(灵魂画手上线(●ˇ∀ˇ●))
QHBoxLayout & QVBoxLayout 这两个的用法基本都是相似的,注意不要忘了把Layout对象放到父类容器里去就行。
1 2 3 4 5 6 7 QHBoxLayout layout; layout.addStretch(1 ); layout.addWidget(new QPushButton("button" ), 1 ); layout.addSpacing(50 ); layout.addStretch(1 ); _view->setLayout(&layout);
QGridLayout 1 2 3 4 5 6 7 8 9 10 11 12 13 QGridLayout layout; layout.setColumnStretch(0 , 1 ); layout.setColumnStretch(3 , 1 ); layout.setRowStretch(0 , 1 ); layout.setRowStretch(4 , 1 ); layout.addWidget(new QLabel("Username: " ), 1 , 1 ); layout.addWidget(new QLineEdit(), 1 , 2 ); layout.addWidget(new QLabel("Password: " ), 2 , 1 ); layout.addWidget(new QLineEdit(), 2 , 2 ); layout.addWidget(new QPushButton("Login" ), 3 , 2 , 1 , 2 );
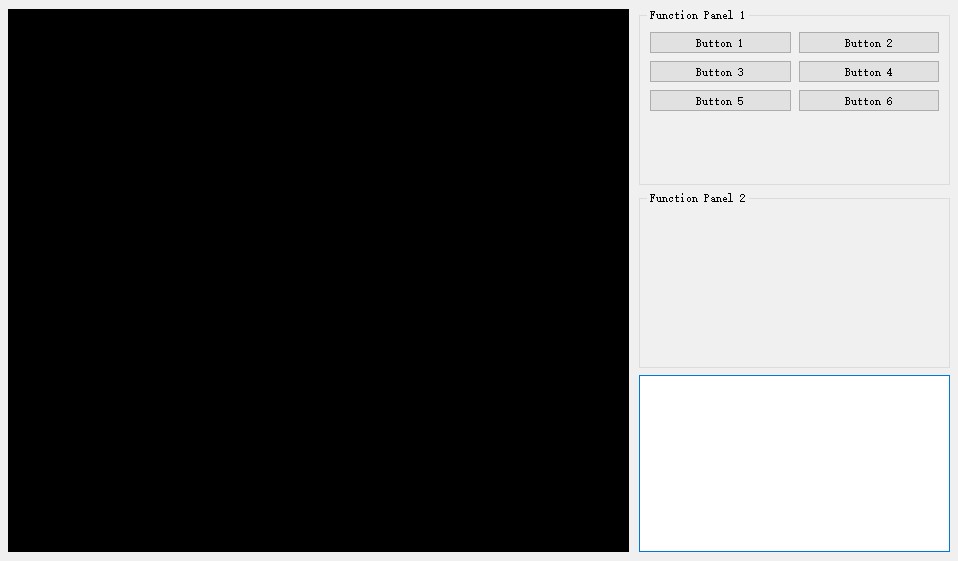
比较实用的布局方式 自己做的Qt框架可能用来显示渲染的模型比较多,所以自己比较推荐的一种布局方式是最外层用QHBoxLayout在水平的布局上做一个大致的比例规划,一般左2右1(分别对应显示界面和操作面板)。在操作面板上可以使用QVBoxLayout放不同的操作模块。在每个操作模块内部,再使用QGridLayout来放置相应的控件,比较方便。实现出的样子如下图:
4. Event&EventFilter Qt消息机制的大概处理流程为:先由QApplication得到具体处理该消息的窗口,再通过event()->event()来根据消息类型调用该消息具体的虚函数。我们可以重载event()函数来处理或截取消息,也可以通过重载具体的虚函数来实现对消息的响应。(如鼠标、键盘消息等)
重写event()截取消息 1 2 3 4 5 6 7 8 9 bool MyWidget::event (QEvent *event) if (event->type() == QEvent::MouseButtonPress) { qDebug() << "Mouse Pressed" ; } return QWidget::event(event); }
closeEvent() 1 2 3 void MyWidget::closeEvent (QCloseEvent* e) qDebug() << "Close window" ; }
mouseEvent() 1 2 3 4 5 6 7 8 9 10 11 12 13 14 15 16 17 18 19 20 21 22 23 24 25 26 27 28 29 30 void MyWidget::mousePressEvent (QMouseEvent *event) QPoint pt = event->pos(); qDebug() << pt; if (event->button() == Qt::LeftButton){ qDebug() << "Press left button" ; } if (event->modifiers() == Qt::ShiftModifier){ qDebug() << "Shift press." ; return ; } if (event->modifiers() == Qt::ControlModifier){ return ; } } void MyWidget::mouseReleaseEvent (QMouseEvent *event) } void MyWidget::mouseMoveEvent (QMouseEvent *event) static int i=0 ; qDebug() << "mouse move" << i++; }
keyEvent() 1 2 3 4 5 6 7 8 9 void MyWidget::keyPressEvent (QKeyEvent *e) e->modifiers(); int key = e->key(); qDebug() << key; qDebug() << (char )key; } void MyWidget::keyReleaseEvent (QKeyEvent *e)
paintEvent() 1 2 3 4 5 void MyWidget::paintEvent (QPaintEvent *e) QPainter p (this ) ; p.drawLine(QPoint(0 , 0 ), QPoint(100 , 100 )); }
EventFilter 控件可以通过给自己安装一个消息过滤器来过滤自己触发的消息。放入的过滤器对象需要实现一个eventFilter函数。
1 2 3 4 5 6 7 8 9 10 11 12 13 14 15 16 17 _button = new QPushButton("This button" , this ); connect (_button, SIGNAL(clicked()), this , SLOT(close ()));_button->installEventerFileter(this ); bool MyWidget::eventFilter (QObject *o, QEvent *e) if (o == (QObject*)_button && ( e->type() == QEvent::MouseButtonPress || e->type() == QEvent::MouseButtonDblClick)){ return true ; } return QWidget::eventFilter(o, e); }
notify() QApplication对象或者它的子类对象能够重写notify函数来实现消息的传递,广播到所有的控件。
1 2 3 4 5 6 7 8 9 10 11 12 13 14 15 16 17 18 19 20 21 22 23 24 25 bool MyApplication::notify (QObject *o, QEvent *e) if (this ->topLevelWidgets().count()>0 ){ QWidget* mainwnd = this ->topLevelWidgets().at(0 ); if (o==(QObject*)mainwnd && e->type() == QEvent::MouseButtonPress) { qDebug() << "Mainwnd is clicked" ; } } return QApplication::notify(o, e); } app.postEvent(&main_window, new QEvent(QEvent::User)); app.sendEvent(&main_window, new QEvent(QEvent::User)); bool MyWidget::event (QEvent *e) if (e->type() == QEvent::User){ qDebug() << "User event is coming" ; } return QWidget::event(e); }
5. Signals and Slots 区别于Java,Qt内设置控件事件监听的方式是通过绑定【信号函数】和【槽函数】的方式。
常规的使用 1 2 3 4 5 6 7 _button = new QPushButton("This button" , this ); connect (_button, SIGNAL(clicked()), this , SLOT(close ()));connect (_button, &QPushButton::clicked, [](){ });
Signal对象和Slot对象 1 2 3 4 5 6 7 8 9 10 11 12 13 14 15 16 17 18 19 20 21 22 23 24 25 26 27 28 29 30 31 32 33 34 35 36 MySignal sig; MySlot slot; QObject::connect (&sig, SIGNAL(sig()), &slot, SLOT(slot())); emit sig.sig(); #ifndef MYSIGNAL_H #define MYSIGNAL_H #include <QObject> class MySignal :public QObject { Q_OBJECT public : explicit MySignal (QObject *parent = nullptr ) signals: void sig () }; #endif #ifndef MYSLOT_H #define MYSLOT_H #include <QObject> class MySlot :public QObject { Q_OBJECT public : explicit MySlot (QObject *parent = nullptr ) signals: public slots: void slot () "I'm a slot." }; }; #endif
加一段课上记得笔记:
注意:
另外:
总结:
6. Dialog 在使用dialog的时候,常常会涉及到一个模态框的概念。模态框出现的时候,当前应用的窗体是以堆栈的形式呈现给用户的,也就是说我们能操作到的窗口只有当前最顶层的窗口。通常我们在main函数的app对象中使用widget.show()展现的并不是一个模态框。
在模块对话框中,exec()有自己的消息循环,并且把app的消息循环接管了。如果dialog是通过exec()来显示,那么可以通过accept()或者reject()来关闭窗口。如果dialog是通过show()来显示,那么可以通过close()来关闭窗口(同QWidget)。
1 2 3 4 5 6 7 8 QDialog* dlg = new QDialog; QPushButton* button = new QPushButton(dlg); connect (button, SIGNAL(clicked()), dlg, SLOT(accept()));int res = dlg->exec();if (res == QDialog::Accepted) qDebug() << "Accepted" ;else if (res == QDialog::Rejected) qDebug() << "Rejected" ;
Qt中也内置了很多不同的Dialog,其具体的显示方式与计算机的操作系统有关。下面介绍几个比较常用的:
QFileDialog & QFileInfo 1 2 3 4 5 6 7 8 9 10 11 12 13 14 15 16 17 18 19 20 21 22 QString file_name = QFileDialog::getOpenFileName(NULL , "select pic file" , _strDir, "pic file (*.png *.jpg)" ); QString file_name = QFileDialog::getExistingDirectory(); qDebug() << file_name; if (file_name.isEmpty()){ qDebug() << "select none" ; return ; } QFileInfo fileInfo (file_name) ;_strDir = fileInfo.filePath(); QString file_name = QFileDialog::getSaveFileName(NULL , "Select file for save" , _strDir, "Png file (*.png)" ); QString file_name = QFileDialog::getSaveFileName(NULL , "Select file for save" , _strDir, "Pic file (*.png *.jpg)" );
QColorDialog 1 2 3 QColorDialog color; color.exec(); QColor c = color.selectedColor();
QFontDialog 1 2 3 QFontDialog font; font.exec(); QFont f = font.selectedFont();
QMessageBox 1 2 3 4 5 6 7 8 9 10 11 QMessageBox::warning(this , "Error" , "Error msgs..." ); QMessageBox::information(this , "Error" , "Error msgs..." ); QMessageBox::critical(this , "Error" , "Error msgs..." ); int ret = QMessageBox::question(this , "???" , "ready?" , QMessageBox::Yes | QMessageBox::No | QMessageBox::YesAll);if (ret == QMessageBox::Yes){ qDebug() << "Yes" ; }else if (ret == QMessageBox::No){ qDebug() << "No" ; }
1 2 QInputDialog input; input.exec();
7. Qt Designer Qt还提供了相应的Qt Designer来进行前端的编辑,有点像Android界面的编辑。可视化的交互界面确实十分方便,你也能够同时为控件添加相应的槽函数(可以参考Qt Designer里槽函数的一些命名规范)。Qt Designer也将前端的界面定义为*.ui格式的XML文件,上手十分快,这里就不过多介绍。 (虽然是比较好用,但自己对*.ui文件的关联绑定这一块确实还不太清楚,先老老实实地直接写在MainWindow里好了,也方便跨平台的调试)